Stack height issue with 3/4ounce 12 gauge loads
Quote from TomVanAllen on April 27, 2024, 6:32 amWith that much drag on the shot bar, it was kept from going its full stroke.
So I went to the hardware store to buy a new bolt. It is stainless (not that it needed to be, regular carbon steel should work), but it was just a few of the options the hardware store had for 1/4X28 bolts. Yeah, that’s right…28 threads per inch. So a fine thread. As opposed to a coarse thread.
The new bolt is also 2 inches long.
New bolt on top. The original Dillon bolt with the groove milled in it is on bottom:
With that much drag on the shot bar, it was kept from going its full stroke.
So I went to the hardware store to buy a new bolt. It is stainless (not that it needed to be, regular carbon steel should work), but it was just a few of the options the hardware store had for 1/4X28 bolts. Yeah, that’s right…28 threads per inch. So a fine thread. As opposed to a coarse thread.
The new bolt is also 2 inches long.
New bolt on top. The original Dillon bolt with the groove milled in it is on bottom:
Uploaded files:

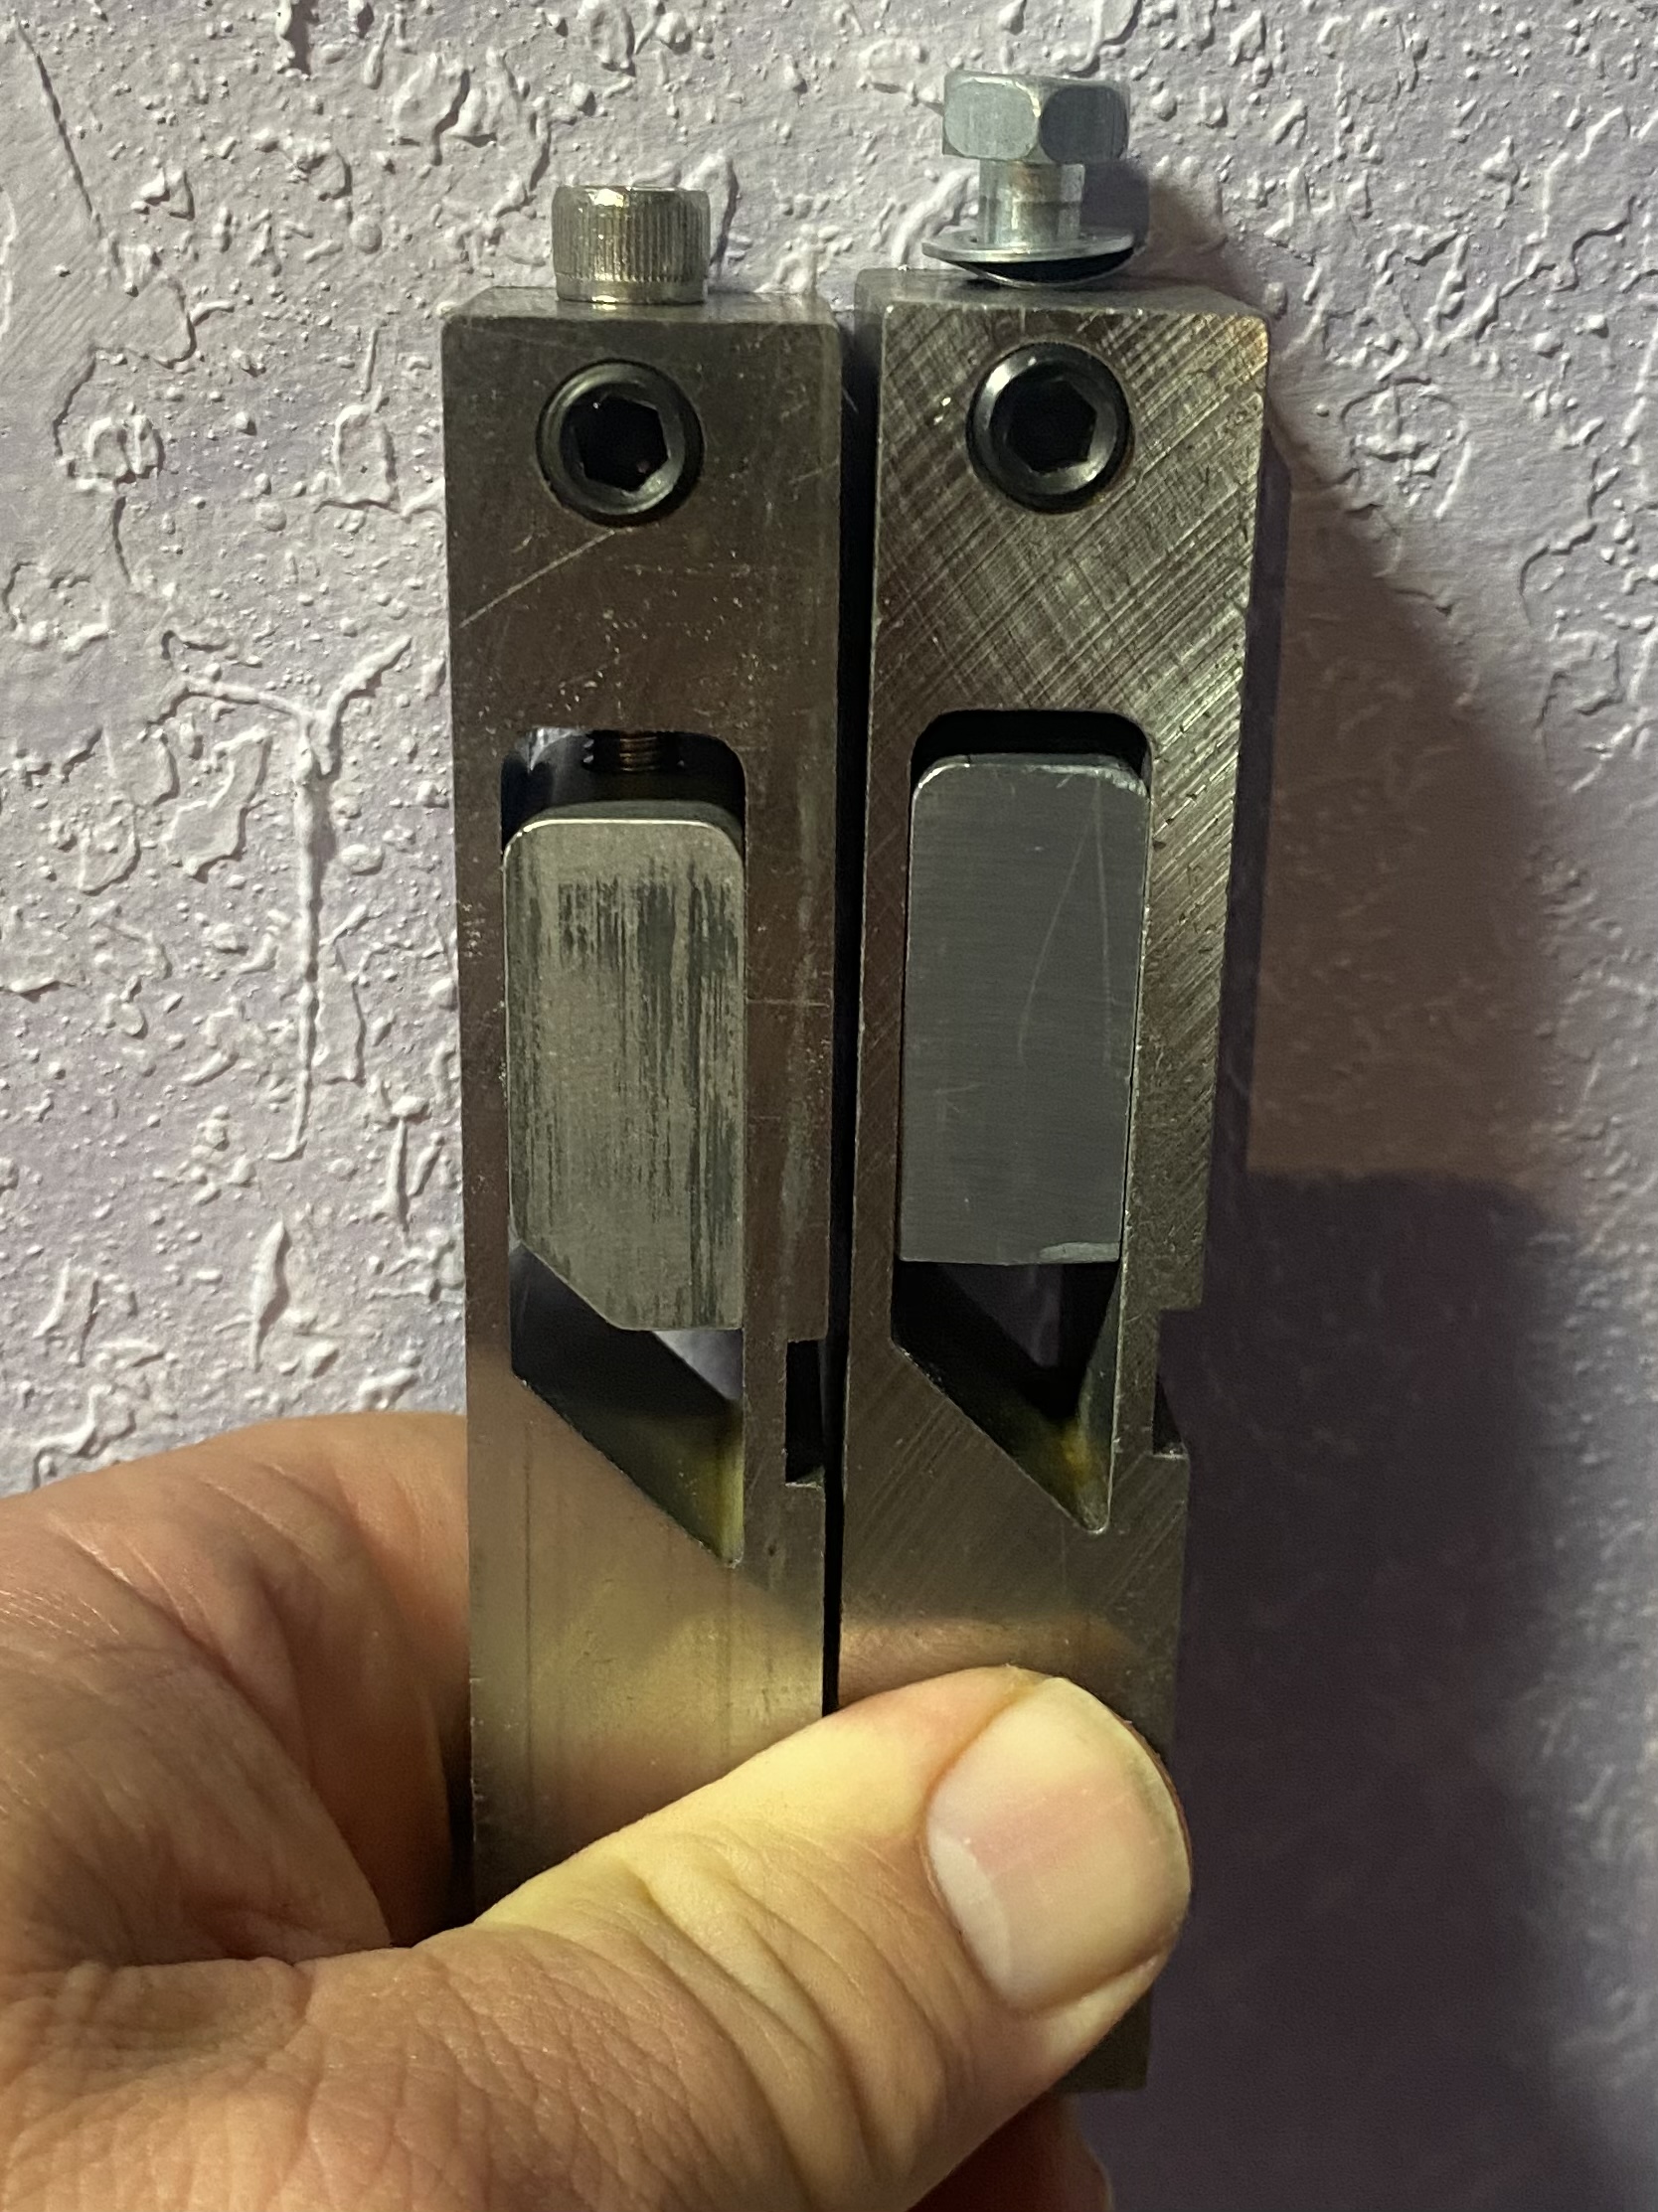
Quote from TomVanAllen on April 27, 2024, 6:37 amThis is what the two shot bars look like…
The original 12 gauge shot bar that is good for an ounce up to 1.5 ounces is on the right. It still has the original Dillon bolt.
The small shot bar is on the left, with the new stainless bolt. It is good for a half ounce up to 1.0 ounce.
I wish I could say I was really smart and planned it this way…
But it turns out that the set screw and the new stainless bolt both take the same size allen wrench.
This is what the two shot bars look like…
The original 12 gauge shot bar that is good for an ounce up to 1.5 ounces is on the right. It still has the original Dillon bolt.
The small shot bar is on the left, with the new stainless bolt. It is good for a half ounce up to 1.0 ounce.
I wish I could say I was really smart and planned it this way…
But it turns out that the set screw and the new stainless bolt both take the same size allen wrench.
Uploaded files:
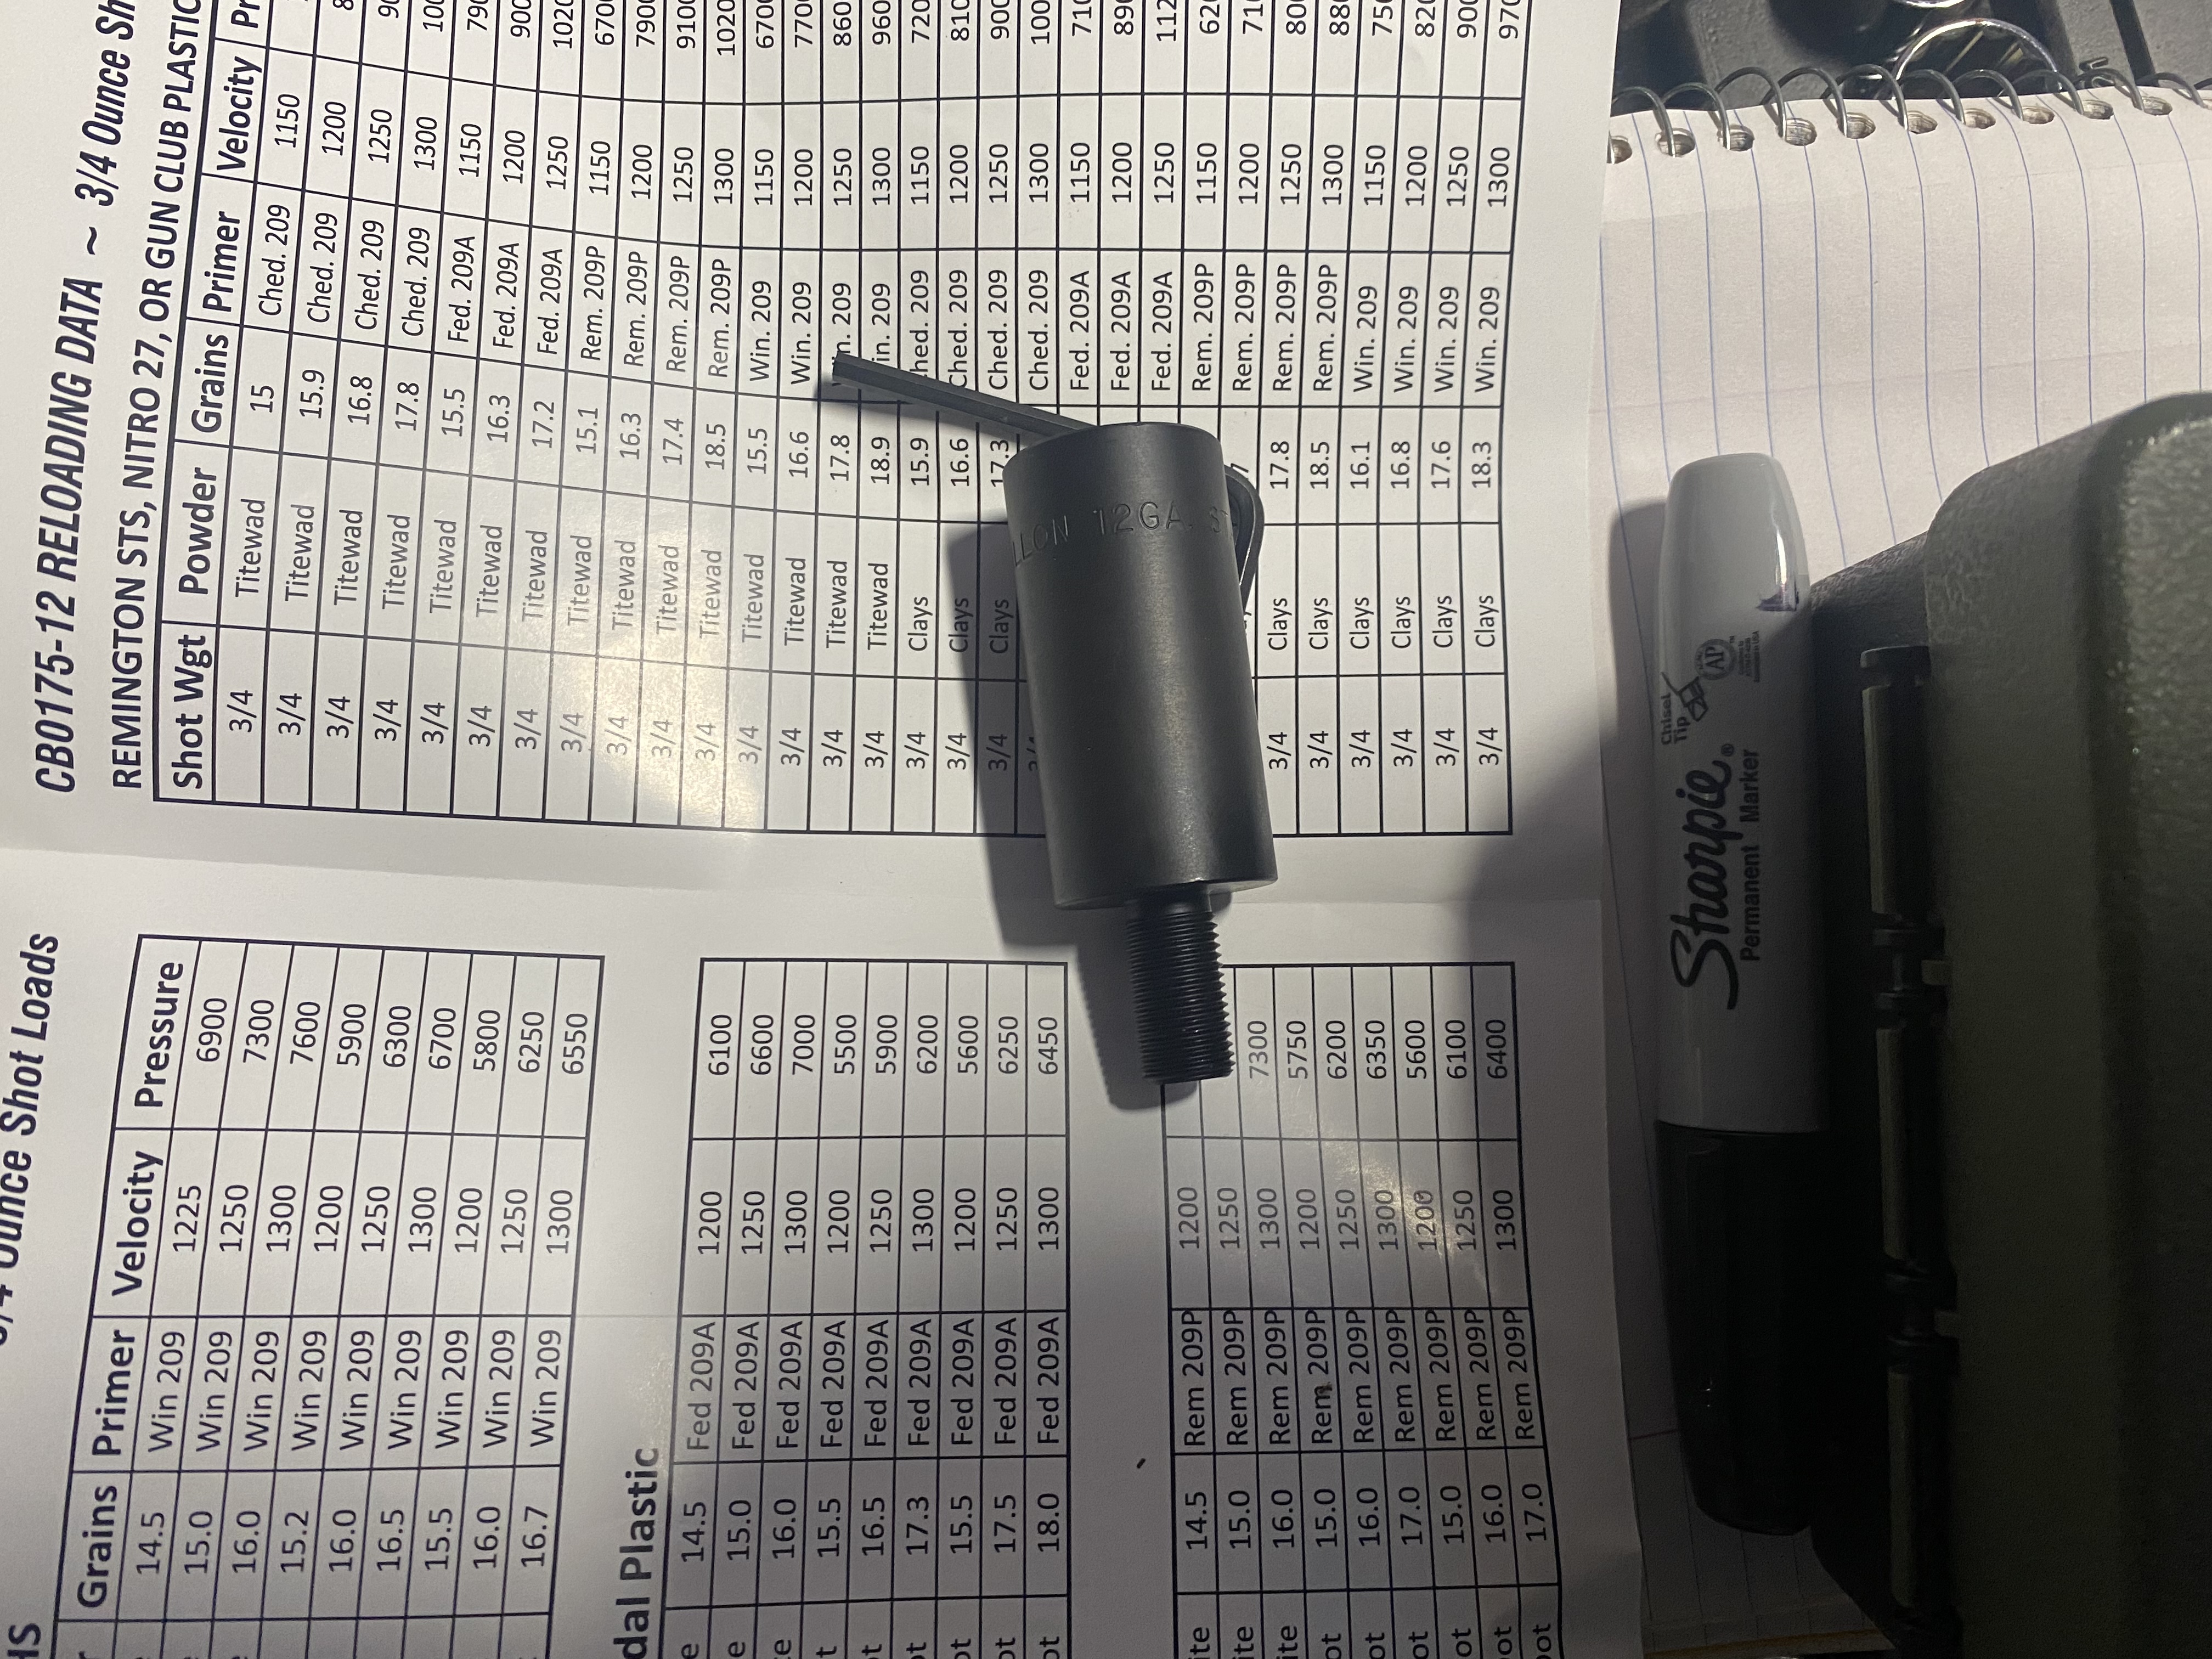
Quote from TomVanAllen on April 27, 2024, 6:46 amAs far as the shot dispenser height goes to drop a 3/4 ounce load with these Clay Buster 0175-12 wads, this is where I ended up:
As far as the shot dispenser height goes to drop a 3/4 ounce load with these Clay Buster 0175-12 wads, this is where I ended up:
Uploaded files:
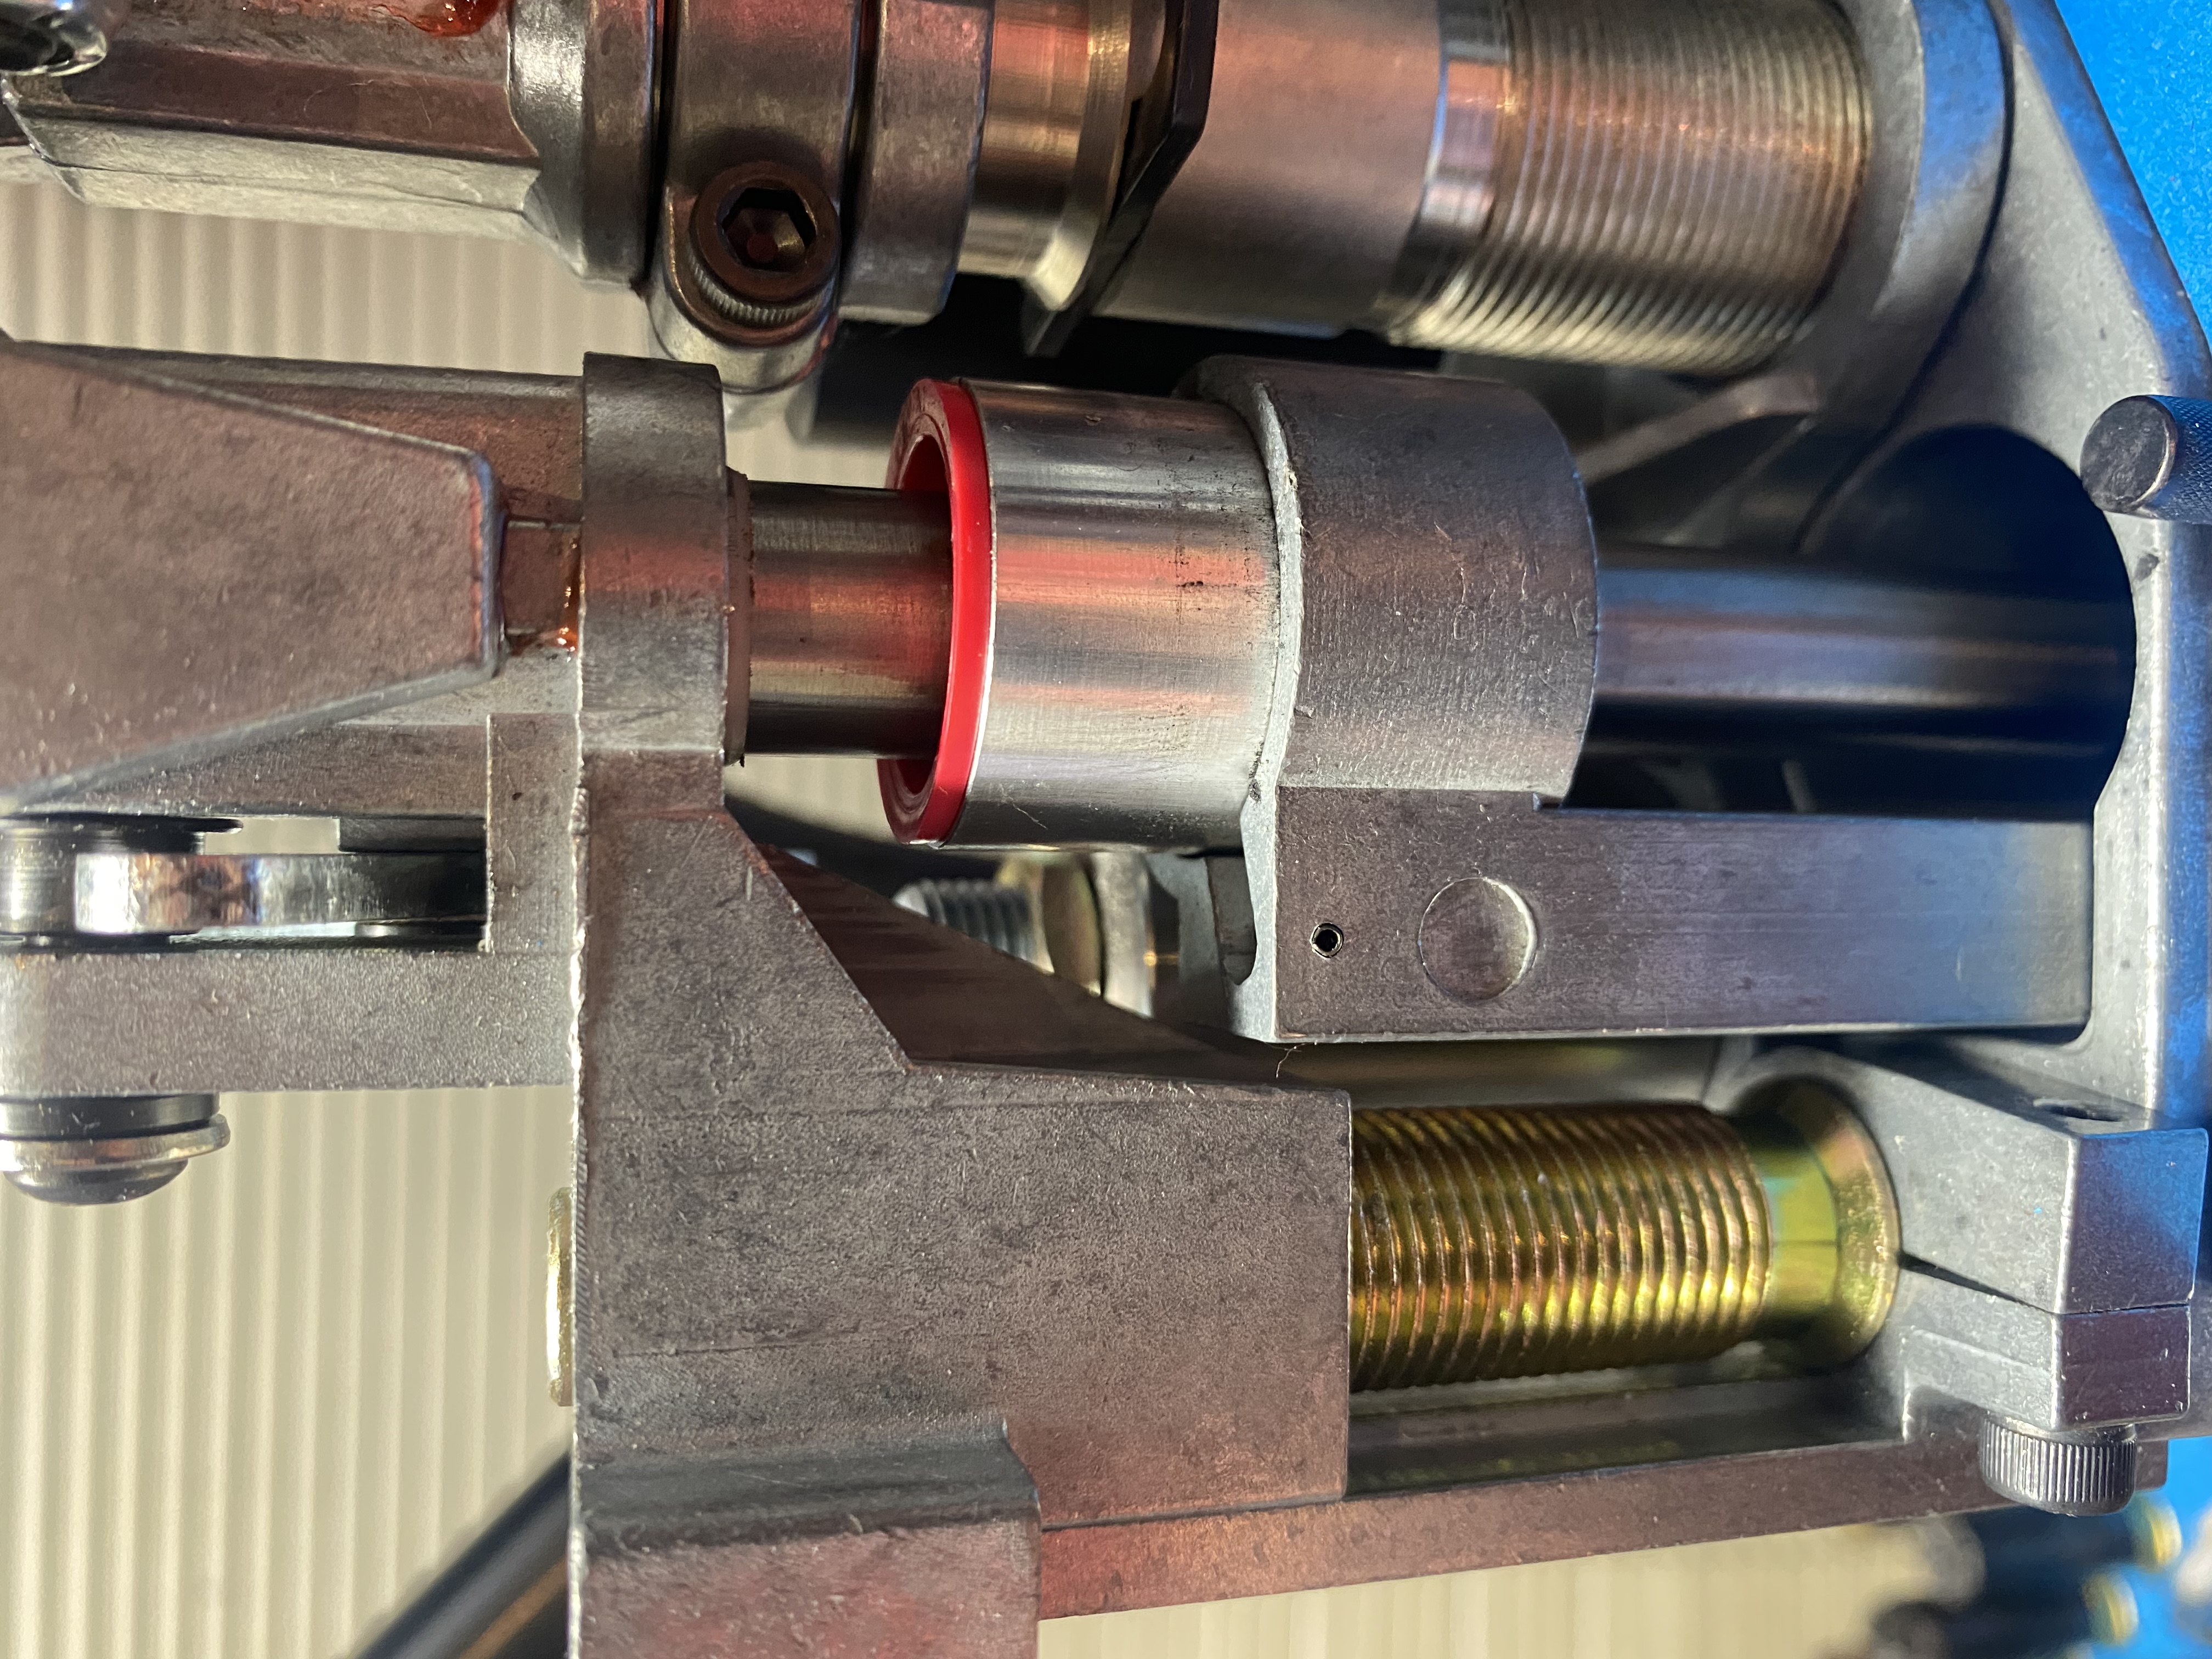
Quote from TomVanAllen on April 27, 2024, 6:49 amYou’ll see that the (yellow zinc coated?) adjuster bolt is almost flush with the body collar. You can also just barely see the black set screw or clamping screw poking through there on the left:
You’ll see that the (yellow zinc coated?) adjuster bolt is almost flush with the body collar. You can also just barely see the black set screw or clamping screw poking through there on the left:
Uploaded files:

Quote from TomVanAllen on April 27, 2024, 6:56 amOne last thing, I have plenty of the gold colored Remington Nitro 27 once fired hulls around. I tried cranking out some dummy rounds with those. Turns out my crimps looked a lot better with the Nitro 27s versus the gray Winchester AAHS hulls. So that is what I am going to go with instead. I’ll crank out 25 to 30 live shells with the Remington’s tomorrow.
I’ll be back in a day or two to post at least one more pic.
Thanks again The Human Manual!
One last thing, I have plenty of the gold colored Remington Nitro 27 once fired hulls around. I tried cranking out some dummy rounds with those. Turns out my crimps looked a lot better with the Nitro 27s versus the gray Winchester AAHS hulls. So that is what I am going to go with instead. I’ll crank out 25 to 30 live shells with the Remington’s tomorrow.
I’ll be back in a day or two to post at least one more pic.
Thanks again The Human Manual!
Quote from TomVanAllen on May 13, 2024, 3:10 pmIt’s been a few weeks, I figured better get back in here to post what I think my solution is/was.
I was sorting through my boxes of mixed shells the other night and figured I had way more Remington STS hulls. They are that metallic green color. So I think that helped.
The other change I made was I removed the 8 point pre-crimp “die”. Then I went with the smooth crimp starter. It is supposedly meant for the old skool paper hulls.
It is Dillon part number 16748.
I had been all over trapshooters.com and shotgun world forums trying to figure out a solution to my bad crimps. A lot of the old threads I found said to go with the smooth crimp starter, #16748.
If you bought you SL900 new, it should have come with one (along with the 6 point crimp starter too).
The smooth crimp starter looks like this:
It’s been a few weeks, I figured better get back in here to post what I think my solution is/was.
I was sorting through my boxes of mixed shells the other night and figured I had way more Remington STS hulls. They are that metallic green color. So I think that helped.
The other change I made was I removed the 8 point pre-crimp “die”. Then I went with the smooth crimp starter. It is supposedly meant for the old skool paper hulls.
It is Dillon part number 16748.
I had been all over trapshooters.com and shotgun world forums trying to figure out a solution to my bad crimps. A lot of the old threads I found said to go with the smooth crimp starter, #16748.
If you bought you SL900 new, it should have come with one (along with the 6 point crimp starter too).
The smooth crimp starter looks like this:
Quote from TomVanAllen on May 13, 2024, 3:12 pmThe final height for the shot dispenser / shot drop tube was this:
The final height for the shot dispenser / shot drop tube was this:
Uploaded files: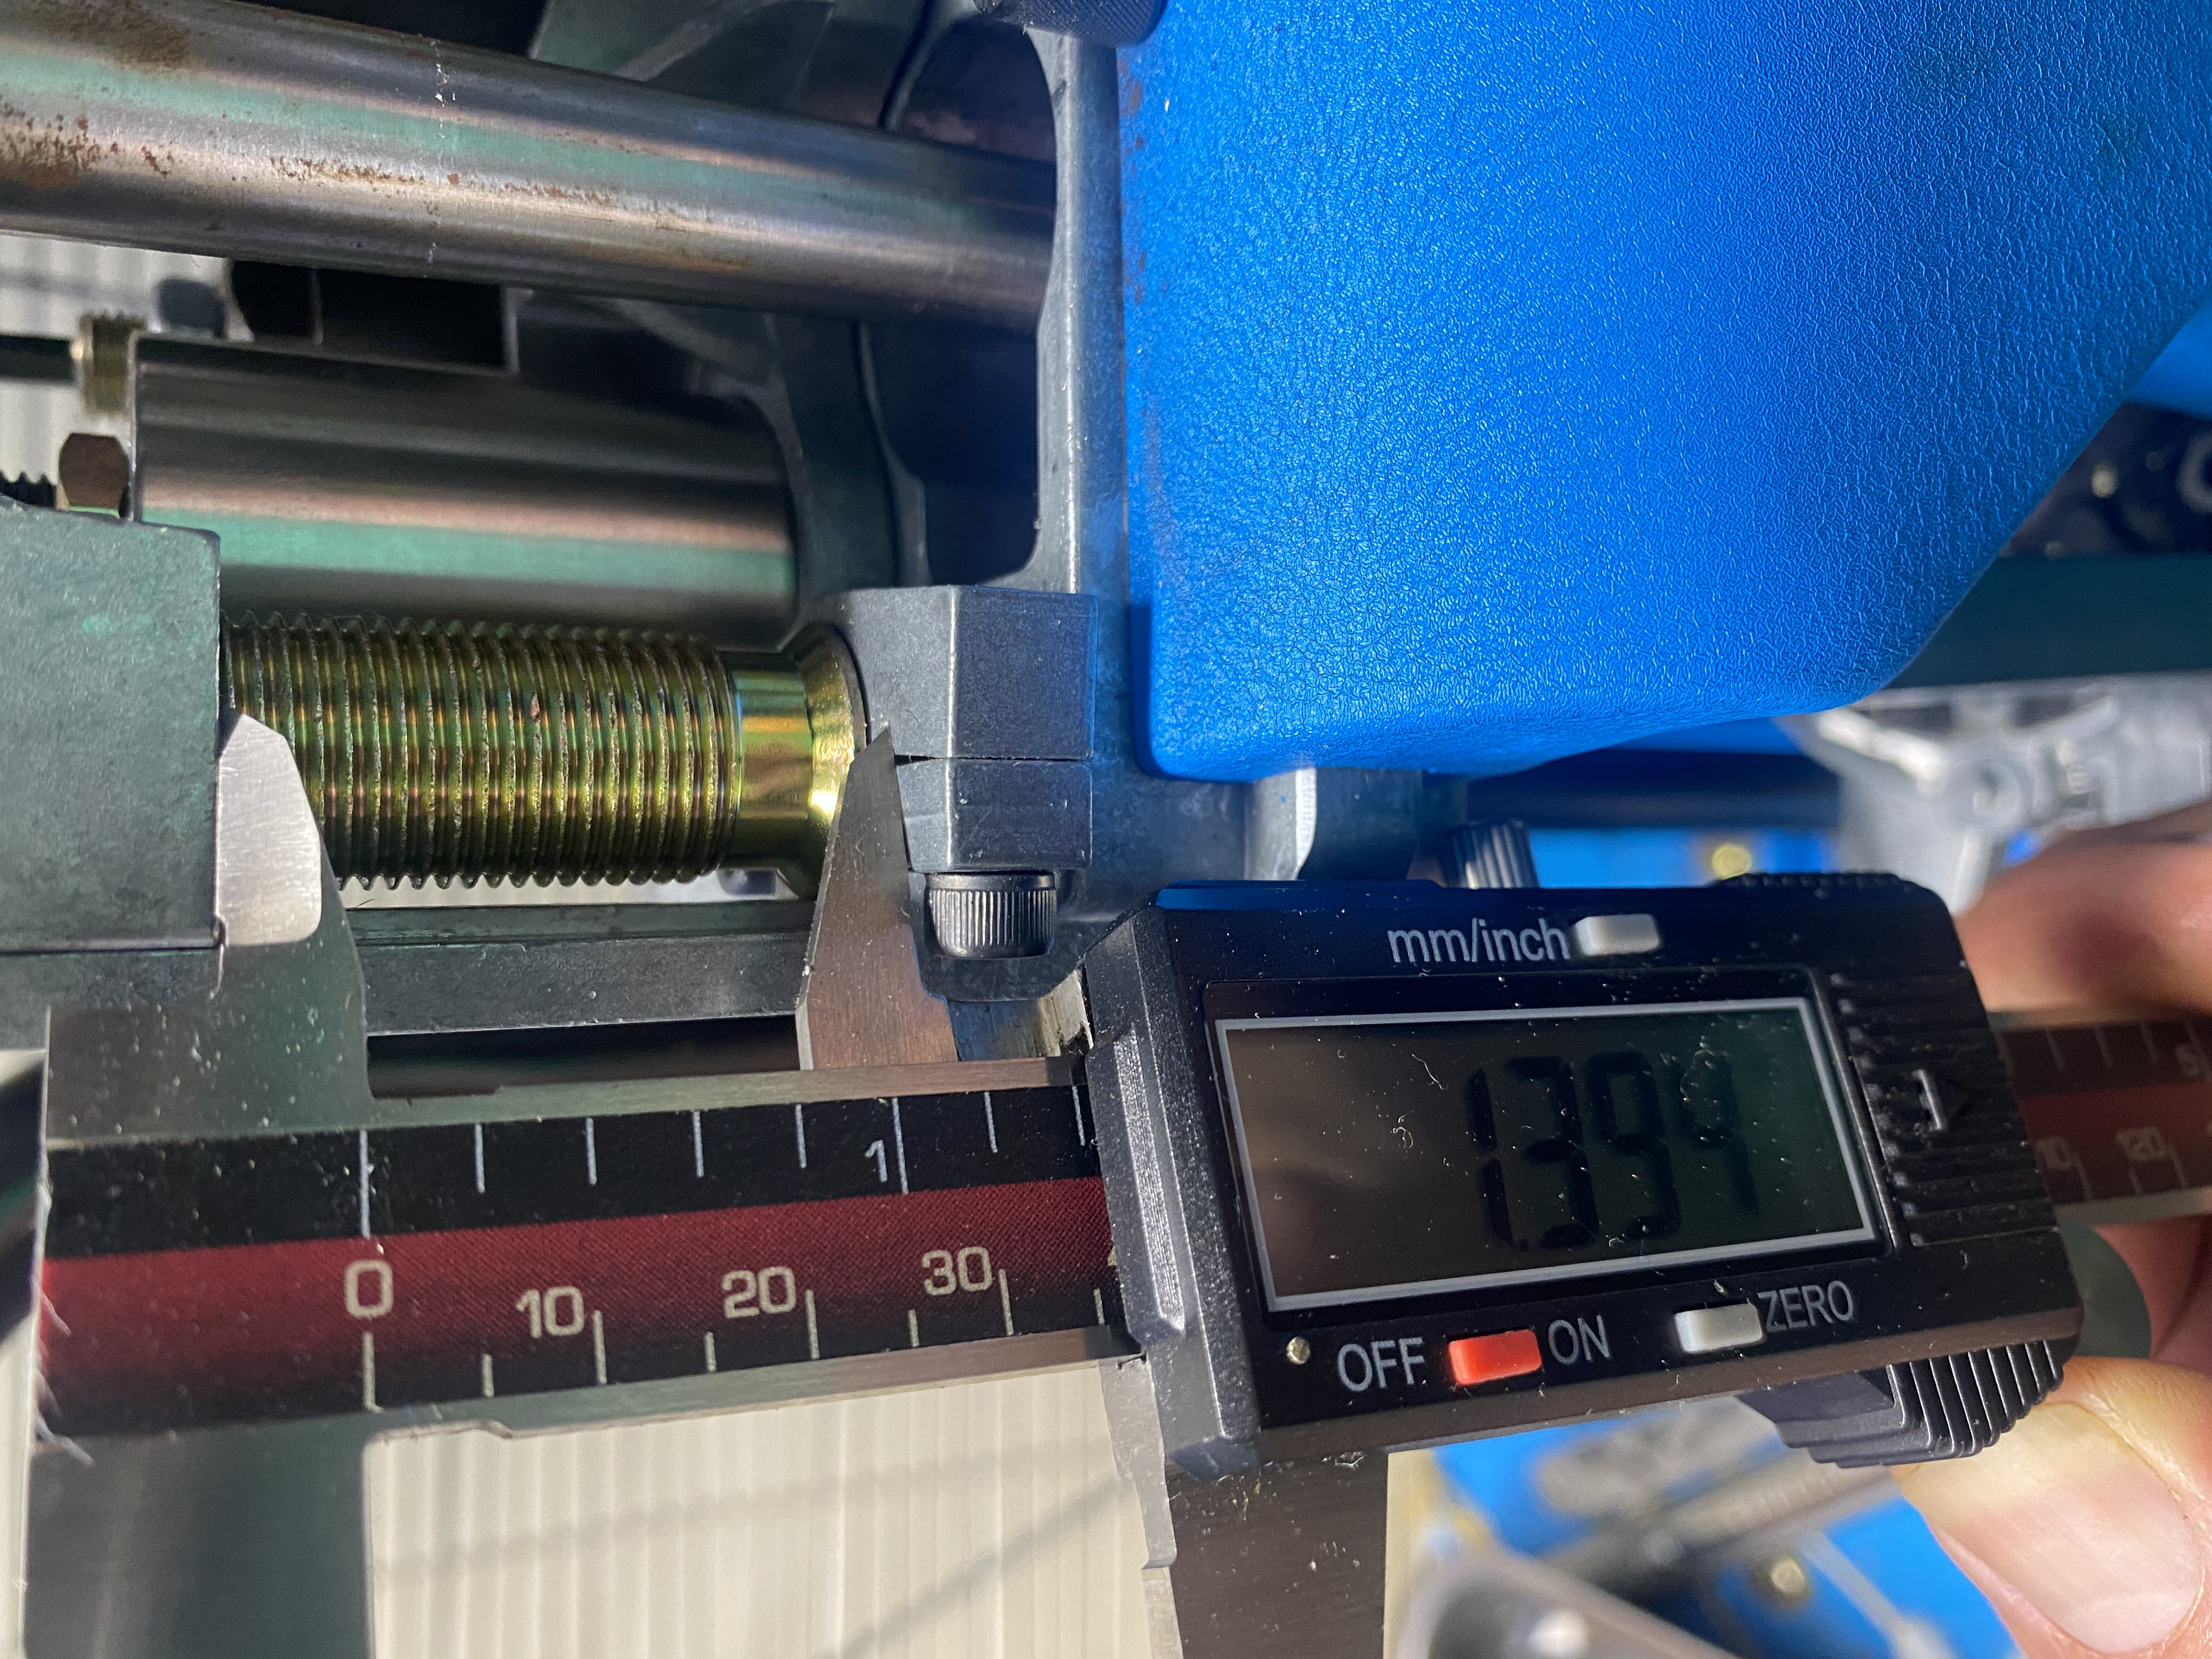
Quote from TomVanAllen on May 13, 2024, 3:17 pmThat digital display reads 1.399”.
If I was really smart / on the ball, when I had my 9/8ths ounce loads dialed in with Winchester AAHS hulls, I should have taken the same picture. And then wrote it down….on say the back of the Dillon SL900 manual.
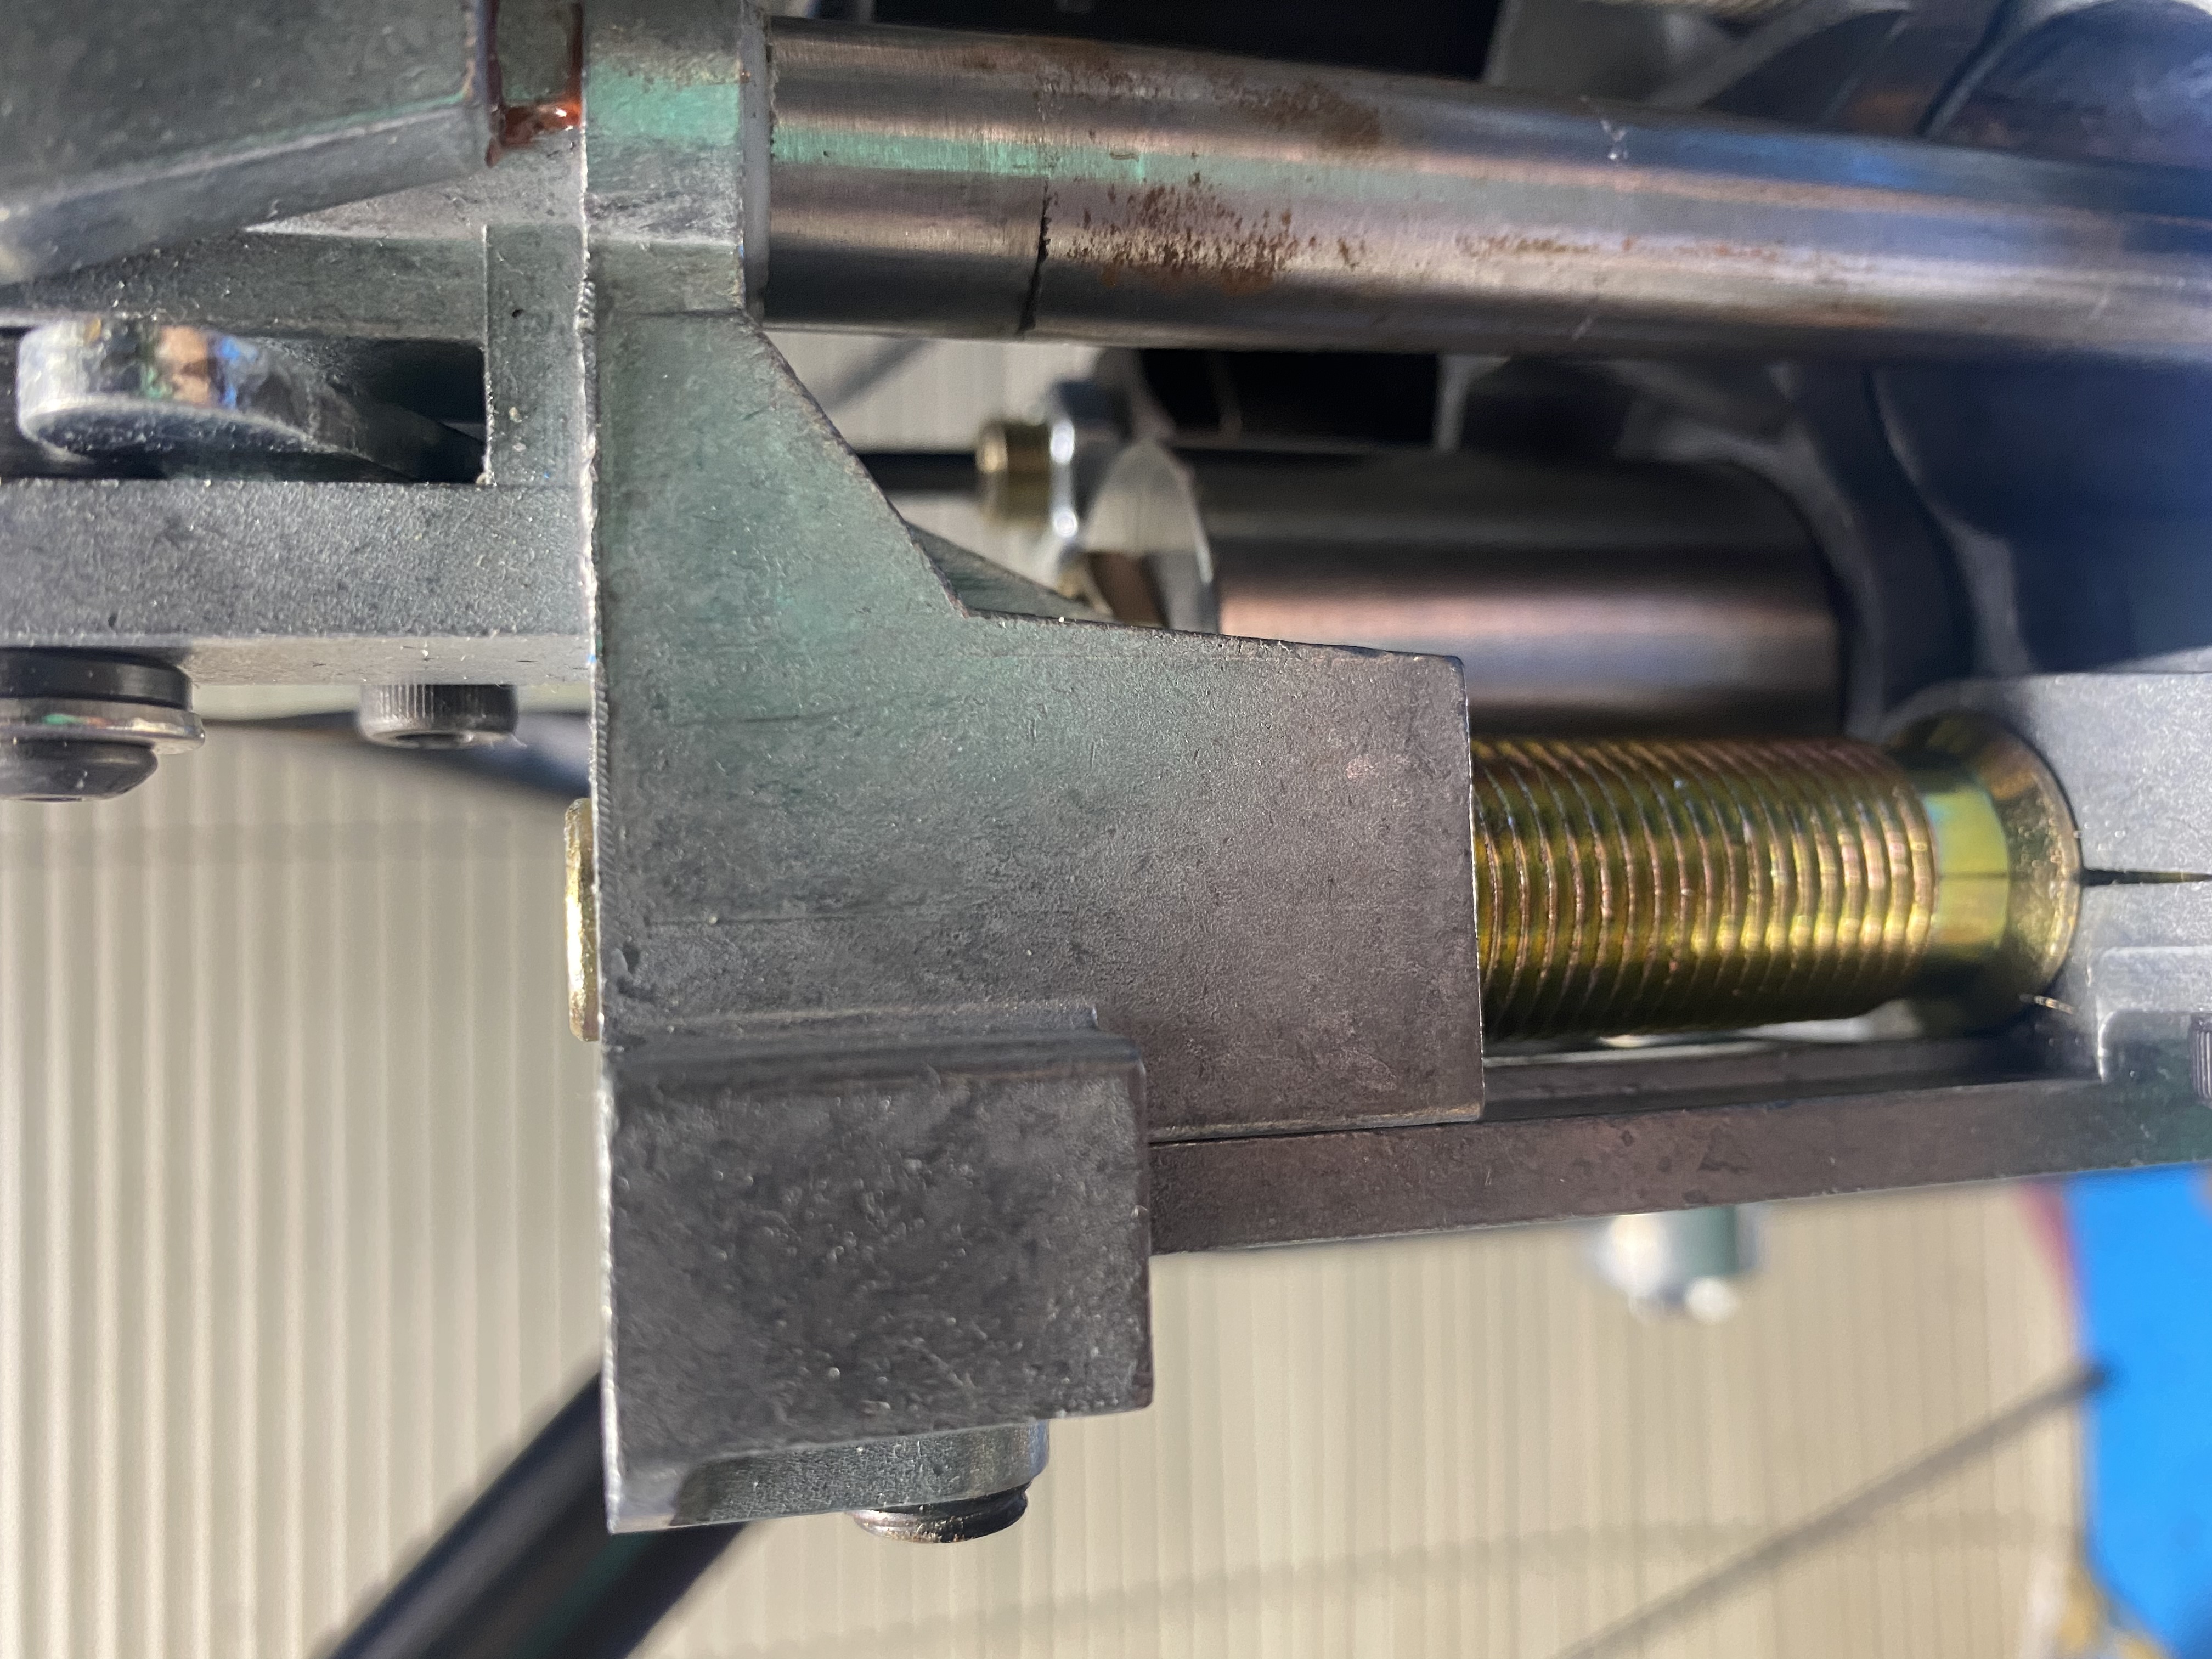
This next pic just illustrates how much of that adjuster bolt is left showing up top:
That digital display reads 1.399”.
If I was really smart / on the ball, when I had my 9/8ths ounce loads dialed in with Winchester AAHS hulls, I should have taken the same picture. And then wrote it down….on say the back of the Dillon SL900 manual.
This next pic just illustrates how much of that adjuster bolt is left showing up top:
Uploaded files:
Quote from TomVanAllen on May 13, 2024, 3:39 pmHaving switched over to the metallic green Remington STS hulls just last night, there was some trial and error getting the final crimp right.
Trying for that perfect looking crimp, just one quarter turn down on the central “bolt” in the final crimp die yielded buckled shells.
so I would have to back that bolt off by a quarter turn. And be satisfied with a “happy medium” on how the crimps looked.
I have one of the Lyman shell checkers. It is an orange anodized aluminum cylinder that is basically just like a case gauge you would use for finished .223 or 9mm reloads.
So in QA/QC’ing my shells last light, I had to screw the sizing/decapping die down. There were some of my reloads that would fit the Lyman checker until it got to the brass headstamp/rim. So more resizing was called for.
I went to Hobby Lobby to buy some paint markers. I bought a set that contains a metallic green. I am going to give it a few days for the shells that I made last night. I want to see if their crimps open up… or “mushroom” if they are all good, I am going to run a metallic green paint stripe down all the dies and onto the toolhead. Call them “witness marks”. That way I can see if something went out of adjustment. Or if I switch back to 9/8ths loads, hopefully I can switch back to the 3/4ths settings quicker/easier.
Having switched over to the metallic green Remington STS hulls just last night, there was some trial and error getting the final crimp right.
Trying for that perfect looking crimp, just one quarter turn down on the central “bolt” in the final crimp die yielded buckled shells.
so I would have to back that bolt off by a quarter turn. And be satisfied with a “happy medium” on how the crimps looked.
I have one of the Lyman shell checkers. It is an orange anodized aluminum cylinder that is basically just like a case gauge you would use for finished .223 or 9mm reloads.
So in QA/QC’ing my shells last light, I had to screw the sizing/decapping die down. There were some of my reloads that would fit the Lyman checker until it got to the brass headstamp/rim. So more resizing was called for.
I went to Hobby Lobby to buy some paint markers. I bought a set that contains a metallic green. I am going to give it a few days for the shells that I made last night. I want to see if their crimps open up… or “mushroom” if they are all good, I am going to run a metallic green paint stripe down all the dies and onto the toolhead. Call them “witness marks”. That way I can see if something went out of adjustment. Or if I switch back to 9/8ths loads, hopefully I can switch back to the 3/4ths settings quicker/easier.
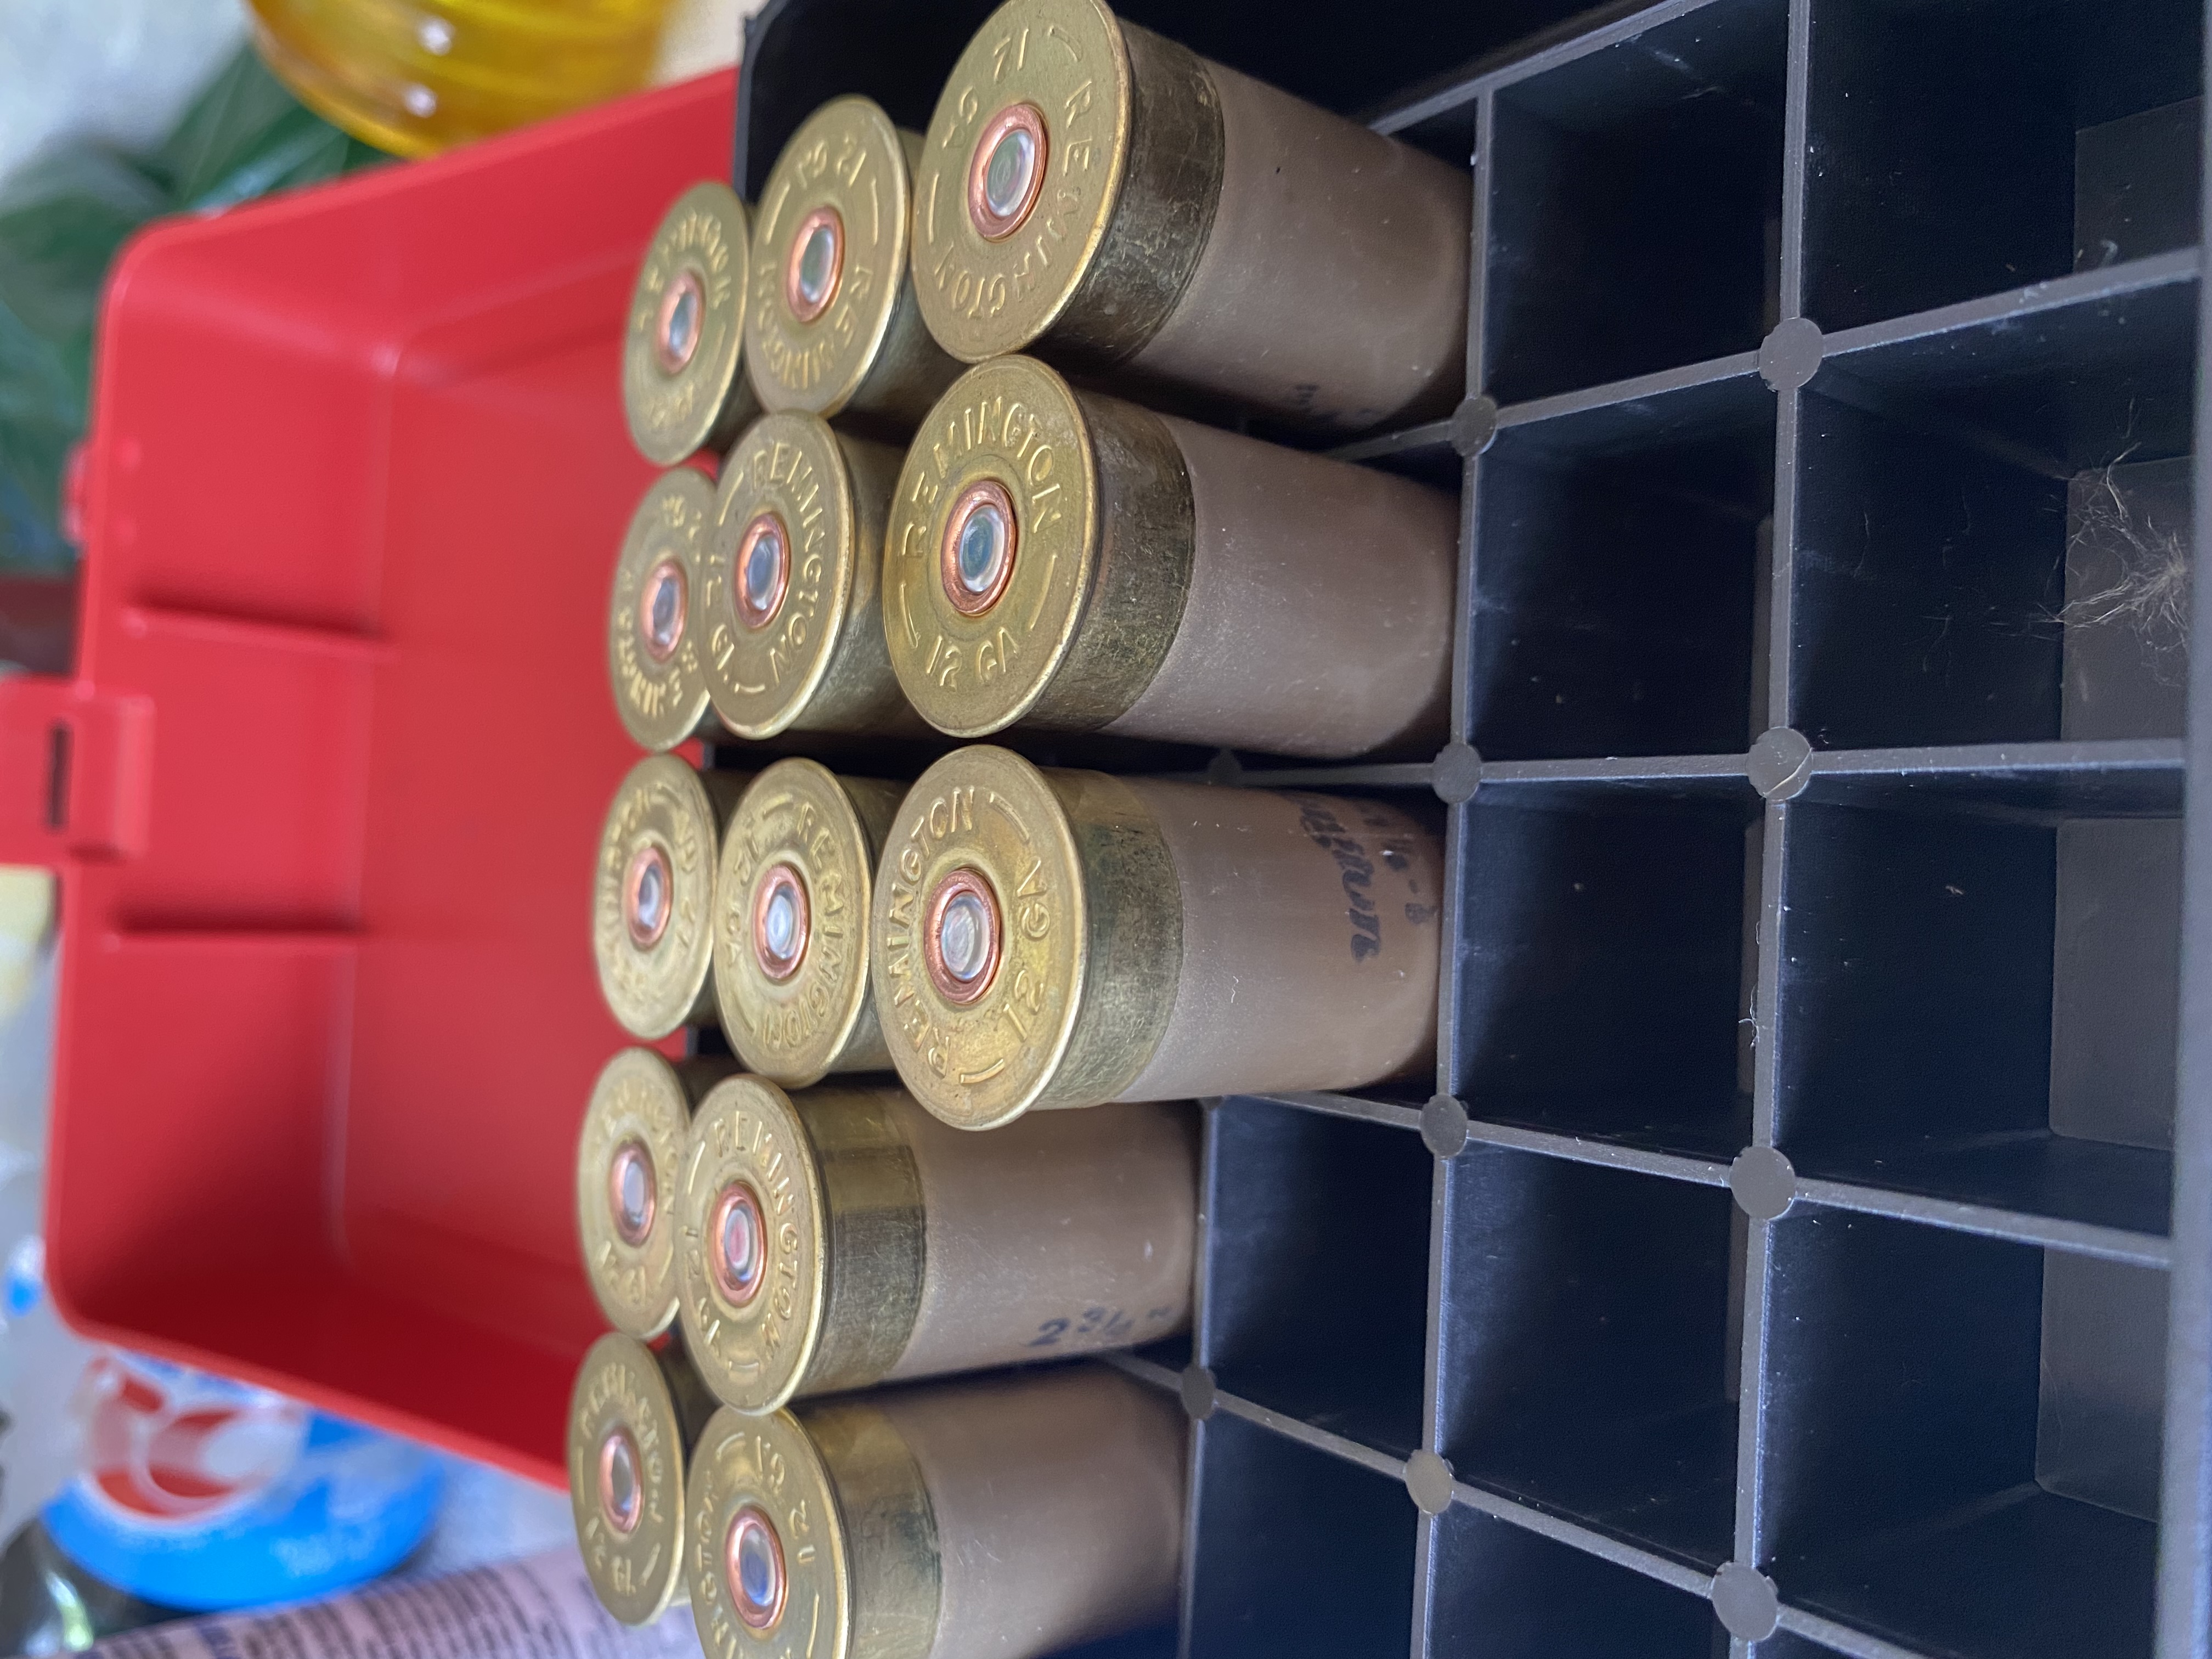
Quote from TomVanAllen on August 17, 2024, 6:09 pmI bought a used Spolar Gold this morning.
the Dillon SL900 did great with 1 ounce and an eighth trap loads. But I never could get it consistent enough with 3/4 ounce wads/loads. I tried two different powders and hull combinations . If the stack height is all over the place, then your crimps will be all over the place too.
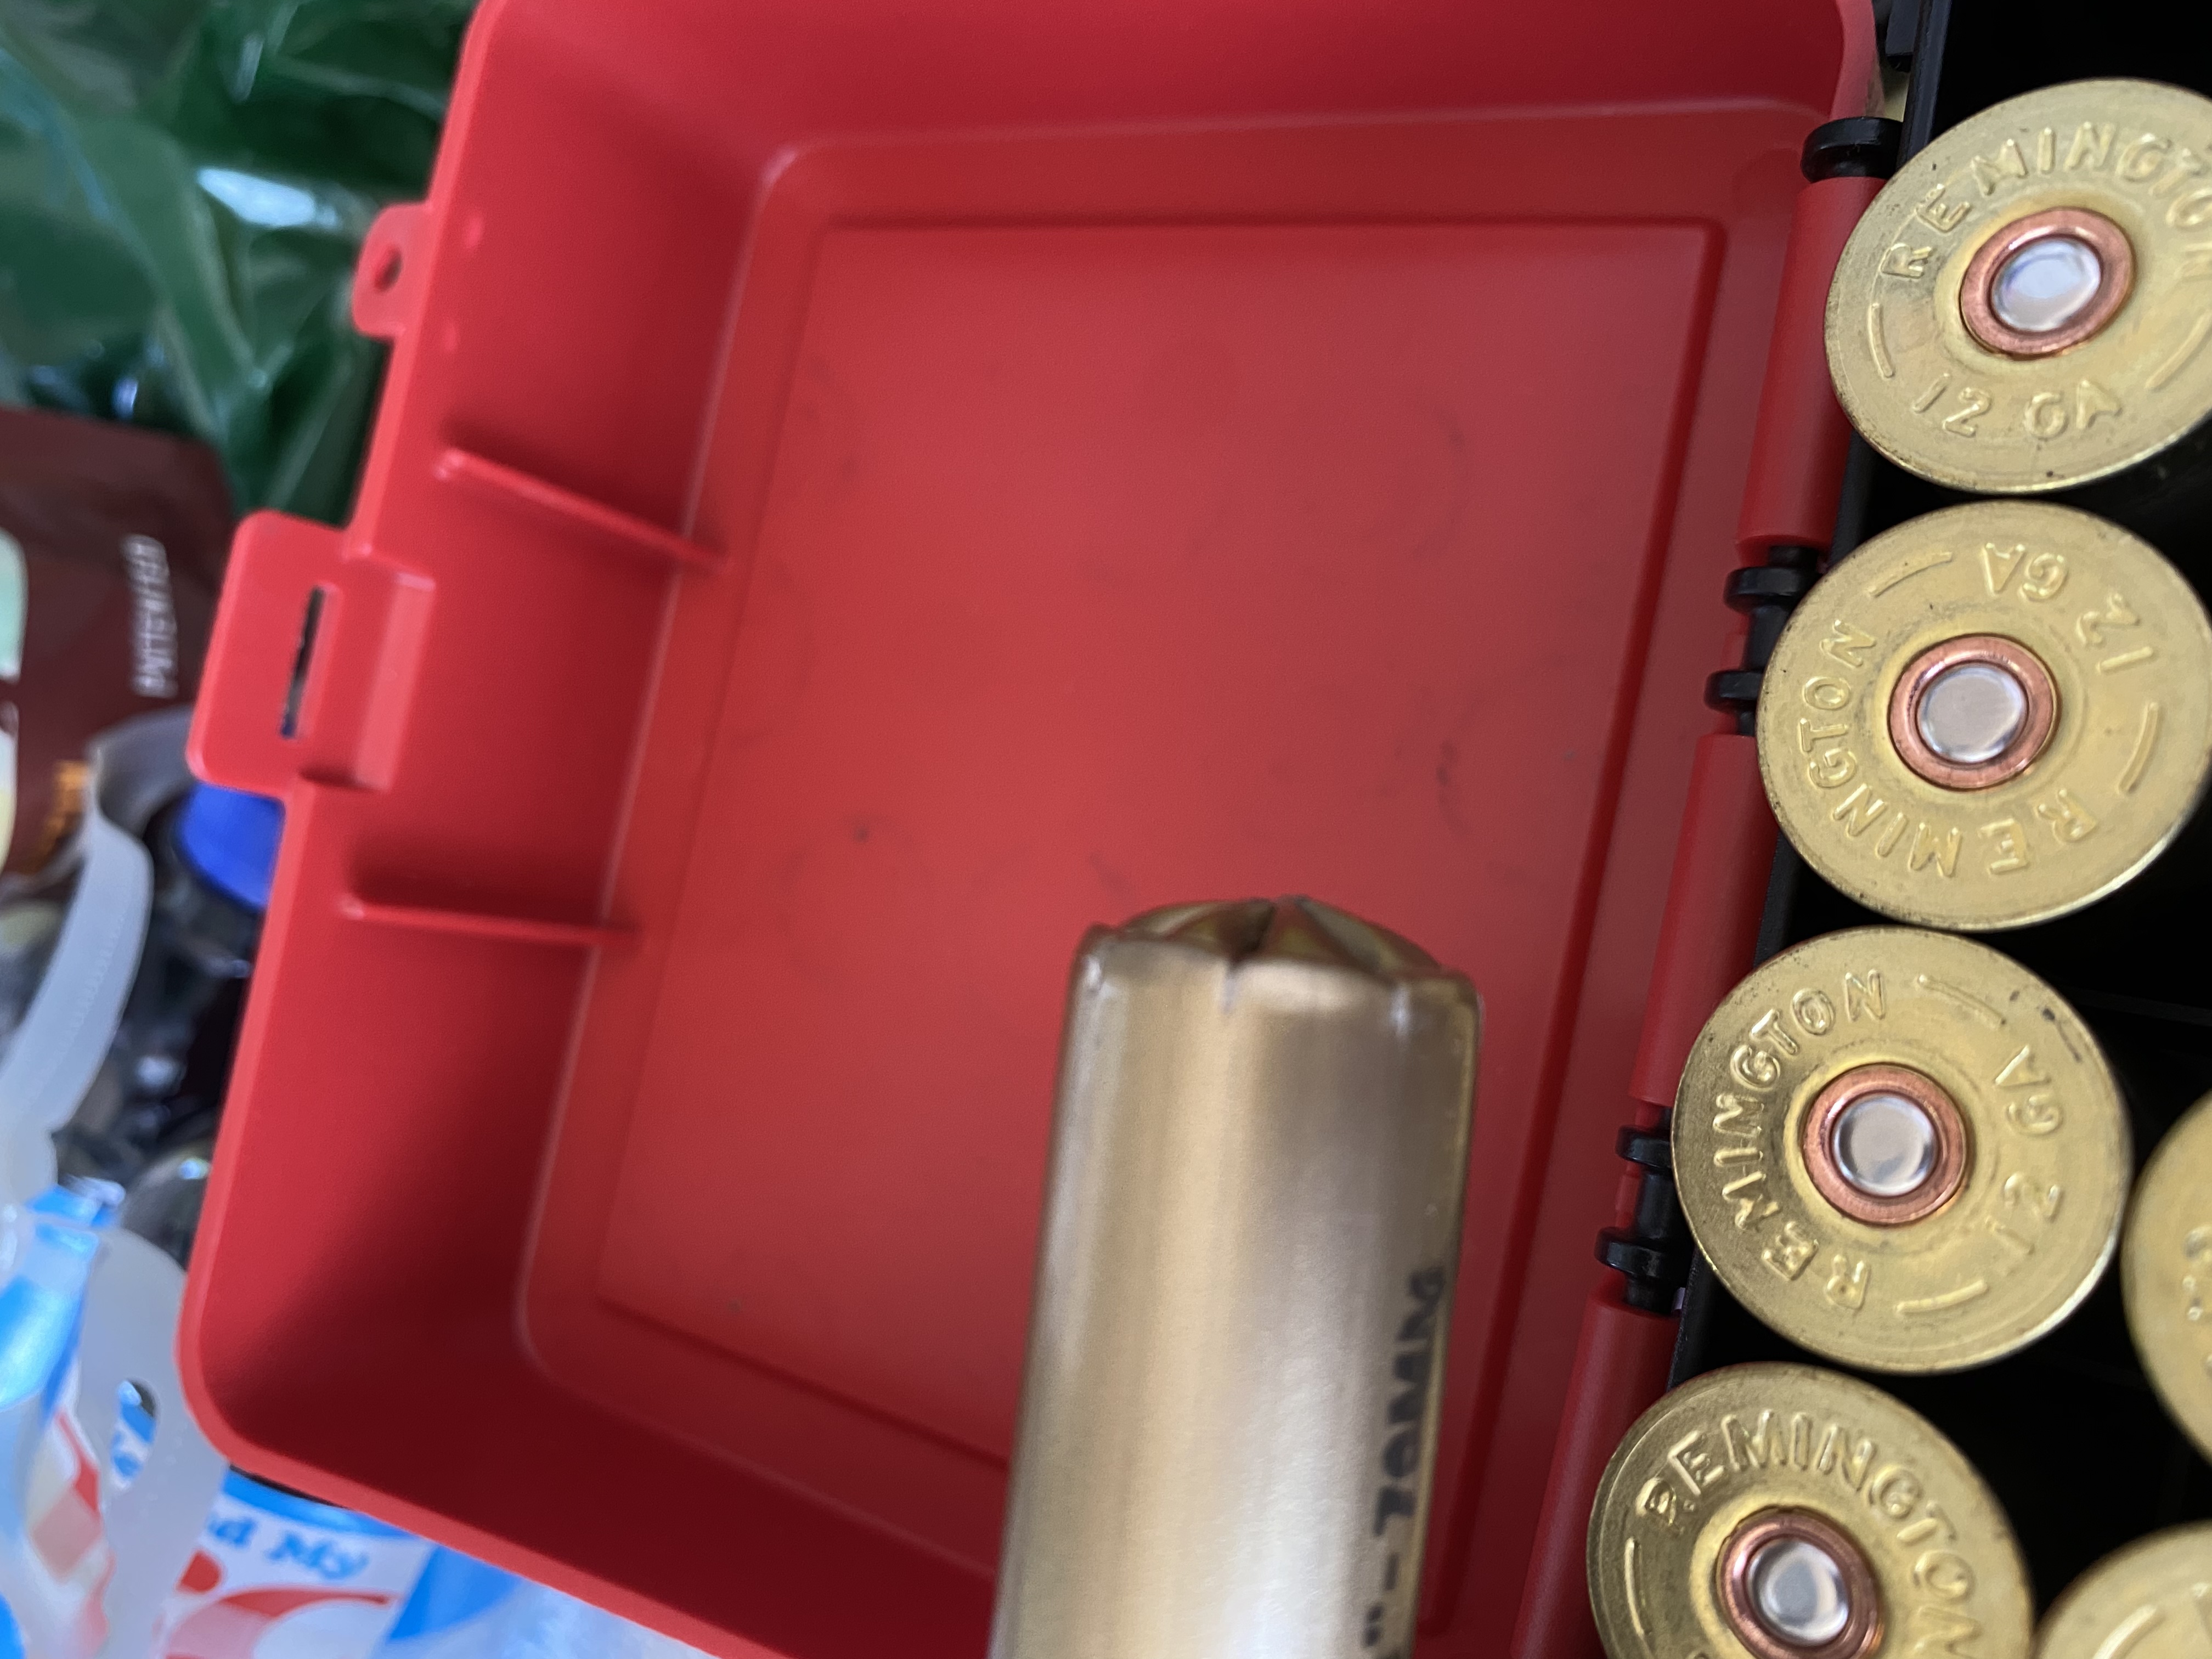
I didn’t trust the crimps enough with the Dillon that I resorted to storing the shells in the flip boxes. When I would check on them two days later, they had done this:
I bought a used Spolar Gold this morning.
the Dillon SL900 did great with 1 ounce and an eighth trap loads. But I never could get it consistent enough with 3/4 ounce wads/loads. I tried two different powders and hull combinations . If the stack height is all over the place, then your crimps will be all over the place too.
I didn’t trust the crimps enough with the Dillon that I resorted to storing the shells in the flip boxes. When I would check on them two days later, they had done this:
Uploaded files: